Frequently Asked Questions on Installation and Configuration
- How to display the Console View Menu in Windows if it was disabled by mistake?
-
How to install Ch Professional Edition
in unix and Mac OS X?
-
Error: cannot restore segment prot after reloc: Permission denied in linux?
-
I got the error Shared object "limb.so.2" not found in FreeBSD 5.4,
how to resolve it?
-
How to uninstall Ch in Windows?
-
How to uninstall Ch in Unix and Mac OS X?
-
When installing Ch in Windows, why does it ask to uninstall
the old
version of Ch? I already uninstalled all of the old version of Ch.
-
Under Windows 95/98/Me, when Ch is started, it is in full screen.
How to change Ch shell in full screen to a window?
-
How to change .c association with Ch instead of Visual C++?
-
How to change the windows home directory in ch shell?
-
How to compile the program in Ch shell or ChIDE?
-
How to install Ch Professional Edition in a teaching lab?
-
How to get the license for a teaching lab?
-
How to update or add new licenses for a teaching lab?
-
How to get Mac address of the machine?
-
How to handle the license error after installing the license file?
-
How to update the Ch license file for a Mac OS X machine?
-
Why does my ChIDE interface become Japanease or Chinese other than English?
-
How to change my IDE display color such as the default comment text color?
Q: How to display the console view Menu in Windows if it was disabled by mistake?
Open the file %appdata%\Console\console.xml, change from
<controls show_menu="0" ...>
to
<controls show_menu="1" ...>
Q: How to install Ch Professional Edition
in unix and Mac OS X?
Assume you downloaded the file xxx.tar.gz, run the following command
   gzip -cd xxx.tar.gz | tar -xvof -
   cd xxx
   run "sh ./install.sh"
Q: Error: cannot restore segment prot after reloc: Permission denied in linux?
The latest Linux enabled new kernel security extensions (SELinux).
SELinux also changes some default system behaviors, such as
shared library loading.
There are two solutions for this.
- update SElinux configuration.
editing the /etc/selinux/config file and
change SELINUX=enforcing to
SELINUX=permissive
After rebooting, it should work. Or you can run the command:
"setenforce Permissive"
- Assume ch is installed at /usr/local/ch directory,
 cd /usr/local/ch
 find . -name '*.dl' -exec chcon -t texrel_shlib_t {} \;
For created dynamically loaded lib such as file.dl using Ch SDK, run
the following command to update the created file.
chcon -t texrel_shlib_t file.dl
Soluiton 2 is recommended.
Q: I got the error Shared object "limb.so.2" not found in FreeBSD 5.4,
how to resolve it?
When you start Ch under FreeBSD 5.4,
you might see the message "/usr/libexec/ld-elf.so.1: Shared object
libm.so.2" not found.
You need Install in FreeBSD compat4x port to
fix this issue.
Q: How to uninstall Ch in Windows?
There are two options.
- You can run from the command line:
c:\ch\uninstall.exe /S
-
Click Control Panel in My Computer. Click
Add/Remove Programs, select SoftIntegration Ch 2.0 xxx Edition,
where xxx can be either Professional, Standard
and Evaluation, then click Add/Remove. Press Yes if you
are asked to complete remove Ch and all of its components.
Q: How to uninstall Ch in Unix and Mac OS X?
The uninstallation instruction can be found in
CHHOME/docs/chinstall.pdf.
You can remove Ch and all related components from CHHOME directory
such as /usr/local/ch. Remove symbolic link /bin/ch.
Remove login shells /bin/ch in /etc/shells if it was installed.
And remove $HOME/.chrc if it was created.
Q: When installing Ch software, why does it always ask to uninstall
the old
version of Ch? I already uninstalled all of the old version of Ch.
It might be because you didn't clean up the registry values for
Ch.
The most likely reason is that you tried to uninstall manually
or uninstallation is incomplete.
One of the following two solutions below may solve the problem.
-
Reboot.
You have to reboot to finish the uninstallation if you are using
Ch while uninstalling Ch.
-
Click the uninstall to continue as you were asked, it will
go through the uninstallation for you automatically. And then
run Ch installation program such as installch_b.exe again to reinstall Ch.
Q: Under Windows 95/98/Me, when Ch is started, it is in full screen.
How to change Ch shell in full screen to a window?
This is related to the default MS-DOS windows setup.
There are three solutions to this problem.
The first solution applies to Ch shell in the current window
only. The other two solutions apply to Ch in
both current window and startup.
-
Type: ALT+ENTER, it will resize the Ch shell prompt in
windows from full screen to normal window, similar to the solution
for changing from full screen to a window in MS-DOS shell.
-
- Open My Computer
- open C: drive
- open the windows directory
- click on "show files"
- click on the system directory
- click on "show files"
- right click on conagent
- select properties
- select the screen tab
- select the window button under usage
- click ok
-
type "Alt"+"Tab", and then the MS-DOS shell will be
found at the toolbars -- at the right hand side
of "Start". Right click the MS-DOS shell=>"Properties",
then click menu "Screen", under "Usage", select
"Window" instead of "Full Screen", then click "Apply".
Q:
How to change the windows home directory in ch shell?
You can follow the microsoft link here to change your home directory.
After the change, you are required to reboot your computer to be effective.
Q:
How to compile the program in Ch shell or ChIDE?
In Unix, if you have gcc or Mac OS X xcode installed, you can compile
the code from Ch shell or ChIDE directly.
In Windows, if you have Microsoft Visual Studio or Express Edition installed,
the installer will do the auto configuration for you.
You need to run "ch -d" to copy the configure file _chrc to your home
directory. Then, start Ch shell using command cl or nmake for
compilation.
To compile From ChIDE, Click menu bar Tools --> Compile to compile
your C code.
If you install Microsoft Visual Studio or Express Edition after Ch has been
installed, run "ch -d" to copy the configure file _chrc to your home
directory, and then edit _chrc file in your home directory to comment
out the settings that we preset for Microsoft Visual Studio.
Q:
How to change .c association with Ch instead of Visual C++?
Click "Start"->"Run", then type explorer from Open:,
it will pop up explorer window, Click menu bar "Files"->"Folder Options",
then select "File Types", Under "Registered file types", scroll
down to the line "C C Source", then select it, it will display
"Opens with: Microsoft Visual studio 2005" depending on your
visual studio version, you can select "Change...", then select "Browse ...",
and find the your ch home directory and select the file "c:\ch\bin\ch.exe",
then select "OK" to close the window.
Q: How to install Ch Professional Edition in a teaching lab?
The Ch Professional Edition and Ch Professional Evaluation Edition are the same except
the license file.
The Professional Evaluation Edition will become the Professional Editon when
the license file is issued and updated.
There are three ways to activate the Ch Professional Edition license.
You can also re-image machines easily, remotely, and silently
using the solutions below for your lab.
-
We offer the activation key to activate the license.
Once the machine is activated, the software can be uninstalled or reinstalled, the license will
still work. If you have the machine reformated, you can use the same activation to reactivate without counting
as a new license. However, once the activation is used for one machine, it cannot be revoked.
Make sure
that you have the write permssion to the license file c:\ch\license\ch.lic
or /usr/local/ch/license/ch.lic in MacOSX.
You can use it to activate the license for school machines and the
student's personal home computer.
Once the Ch Professional software is installed, you can activate the license with the following solution:
run c:\ch\bin\activation.exe or /Application/ChActivation.app if using macos, then input the activation key.
If you have C-STEM installed, you can also activate the license using the solution below:
launch C-STEM Studio, click "C-STEM Studio->Help->Activate Ch License", then enter the activation key.
- You can provide us with the machine's Mac address and operating system
for all machines in your lab. We can then
create a single license file , you can copy it to the default installation destination c:\ch\license\ch.lic or /usr/local/ch/license/ch.lic for all machines.
A single license file
is easy to set up in the master machine to duplicate for other machines in the lab. The mac address can be reused for the future license activation.
If you have a new or replaced machine, you will need to provide
us with the mac address of this new or replaced machine.
- You can use a floating license server and install Ch Professional Edition
in the lab. The floating license server can control up to the maximum allowed number of
machines to use Ch Professional Edition simultaneously.
Please note that the client machines need to have the internet access to the
floating license server when checking out a license at run time.
After checking out, the client machine can run the software for up to 21 days
without the internet access to the floating license server.
You can click here for more information about
floating license server.
You can follow the procedure below to test if the license has
installed successfully
-
For Windows:
Launch ChIDE on the desktop in Windows by clicking the icon for "ChIDE".
ChIDE title should display "Ch Professional Edition" instead of
Ch Evaluation Edition.
-
For Mac OS X:
Launch ChIDE on the Dock or from the Applications folder by clicking
the icon "ChIDE". ChIDE title should display "Ch Professional Edition"
instead of "Ch Evaluation Edition".
For school lab deployment use:
You can also use the solution from C-STEM studio installation to have
the software installed remotely for the lab.
We offer two ways for the lab deployment.
The following installation will install ch to the default c:\ch directory.
you may consider to reboot after the installation to make PATH
environment setting effective for the first time.
If Ch is installed to the same directory as before, no need to reboot.
Q: How to get the license for a teaching lab?
Once you have purchased and installed Ch Professional Edition in a lab,
please ask your system administrator to submit the following information
to support@softintegration.com,
for obtaining either floating or node-lock lab license:
- The Name of School, School District, County, and State.
- The quote number/order number/PO number, or if paid by a special grant.
- The total number of computers and their operating system.
- * If installing with node lock license, please provide the Mac address of
all computers (one Mac address for one machine)
you can get the Mac address based on the instruction here .
* If installing with floating license, please provide the
following information to us
-
Mac address, host name and operating system of your floating license server
-
the operating system and number of floating client machines in the lab.
-
The range of network for your client IP address such as 10.10.10.1/24
- instructor name and email address (optional).
- System administrator name and contact information, including an email address.
Q:
How to update or add new licenses for a teaching lab?
After initial installation, you may replace or add more computers to
the lab or laptop cart, please follow the instructions below
to get the licenses for the new machines.
-
Get the Mac address of new computers,
Send the Mac addresses of the new or replaced computers, the previous lab license file received from us and the Name of School, School District, County, and State and the quote number/order number/PO number, or if paid by grant to support@softintegration.com
-
If you don't have new machines to add/replace, you can just simply
re-send your previous license file and the Name of School, School District, County, and State and the quote number/order number/PO number, or the grant information to support@softintegration.com for renew.
The new license file works with both the old and new computers.
If your existing license works before, you don't have to update
once you get the new license file. The existing license will keep
working as before.
Q:How to get Mac address of a machine?
There are two ways to get Mac address of your machine.
-
Solution 1:
To get the Mac address of your machine, you can follow the
link
- Solution 2 :
If you have Ch or SIGL installed, there is another way to get Mac address
of your machine.
* For Windows
If you have Ch installed, run the following command from an MSDOS shell.
(You can flollow the link here to get into the MSDOS Shell)
          C:\Ch\bin\rlmutil.exe rlmhostid -q  ether

you will get the output:
          00248cbf7c1e

If you have SIGL installed, run  the following command from MSDOS shell.
         C:\silib\rlmenduser\rlmutil.exe rlmhostid -q  ether

you will get the output:
          00248cbf7c1e

* For Mac and Linux

Run the command below from Terminal
(You can flollow the link here to get into the Mac Terminal)
          /usr/local/ch/bin/rlmutil rlmhostid -q  ether

you will get the output:
          00248cbf7c1e

or run the following command if you use SIGL:
       /usr/local/silib/rlmenduser/rlmutil rlmhostid -q  ether

you will get the output:
          00248cbf7c1e

00248cbf7c1e is the Mac address that you need to send to us.

If you have multiple mac address output from the above command, just
keep the first one, the rest can be ignored.
Q: How to handle the license error after installing the license file?
-
 ERROR: installing a demo license for ch_professional v7.0.0 failed
 No "rlm_demo" license available (-139)
This error means that the license file is corrupt. You may
find another way to download the attached license file to copy over
to the license directory.
-
ERROR: failed to find the Ch Professional home directory for checking license
This error means that ch cannot find CHHOME.
-
If you encounter this error with floating license server, it means
that your machine's mac address is not fixed and is dynamically created on
the fly. You may need to find a way to make your mac address fixed.
-
ERROR: The contents of the license file are invalid.
This error usually happens in Linux or Mac OS. It means that the license file
has introduced unexpected "\r\n". There are two ways to resolve this problem.
Either one of the shell command below is fine.
Q: How to update the Ch license file for a Mac OS X machine?
1. First, you get a signed ch.lic license file from SoftIntegration for your Mac OSX machine.
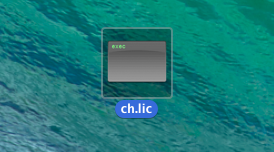
2. If the attached file ch.lic in your email became
ch.lic.txt, you will need to change the file name to ch.lic by the following steps:
Control + Click on the ch.lic file
Click Get Info
Expand .Name & Extension.
Delete the .txt file extension from the file ch.lic.txt.
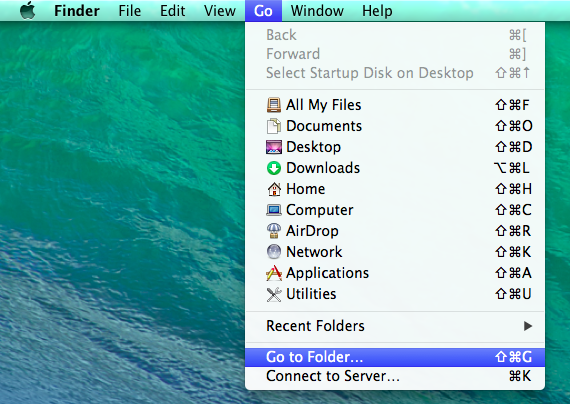
3. Open a new Finder window and on the top bar click Go -> Go to Folder
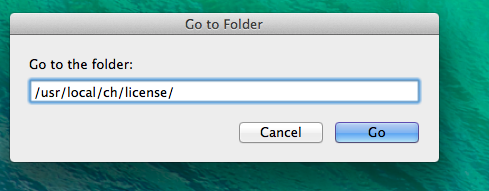
4. In the space provided, type /usr/local/ch/license and click Go
5. The license folder will display the following contents.
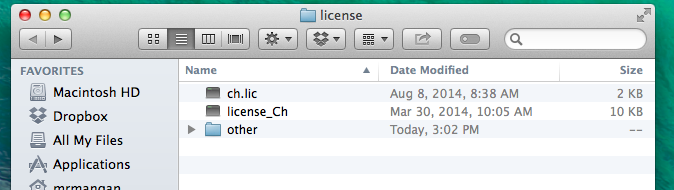
There is already a ch.lic demo license file in this folder. Click and drag the new license file
ch.lic as shown in the first step into this folder to replace the existing file.
Note: You might need administrator access to do this.
Q: Why does my ChIDE interface become Japanease or Chinese other than English?
During the installation for Ch Professional or Ch Student Edition,
the installer will try detect your locale language and makes the ChIDE
becomes non-English based on your locale settings in your operating system.
You can change back to English edition by
copying the file locale.properties from CHHOME\chide\doc\locale\locale.properties to CHHOME\chide, where CHHOME is the directory where Ch is installed.
Q: How to change my IDE display color such as the default comment text color?
You can go to ChIDE, select Options, then Open ChIDE User Option File,
it will open ChIDEUser.properties. Add the following lines into
file ChIDEUser.properties to change the default green color to black color.
You need to restart ChIDE to make this change effective.
# to change the color from the default green to black
# comment out the default green color for comments
#colour.code.comment.box=fore:#007F00
#colour.code.comment.line=fore:#007F00
# Change comments from green to black.
colour.code.comment.box=fore:#000000
colour.code.comment.line=fore:#000000
To use a different color, you can check from the link below:
http://www.color-hex.com/
|